



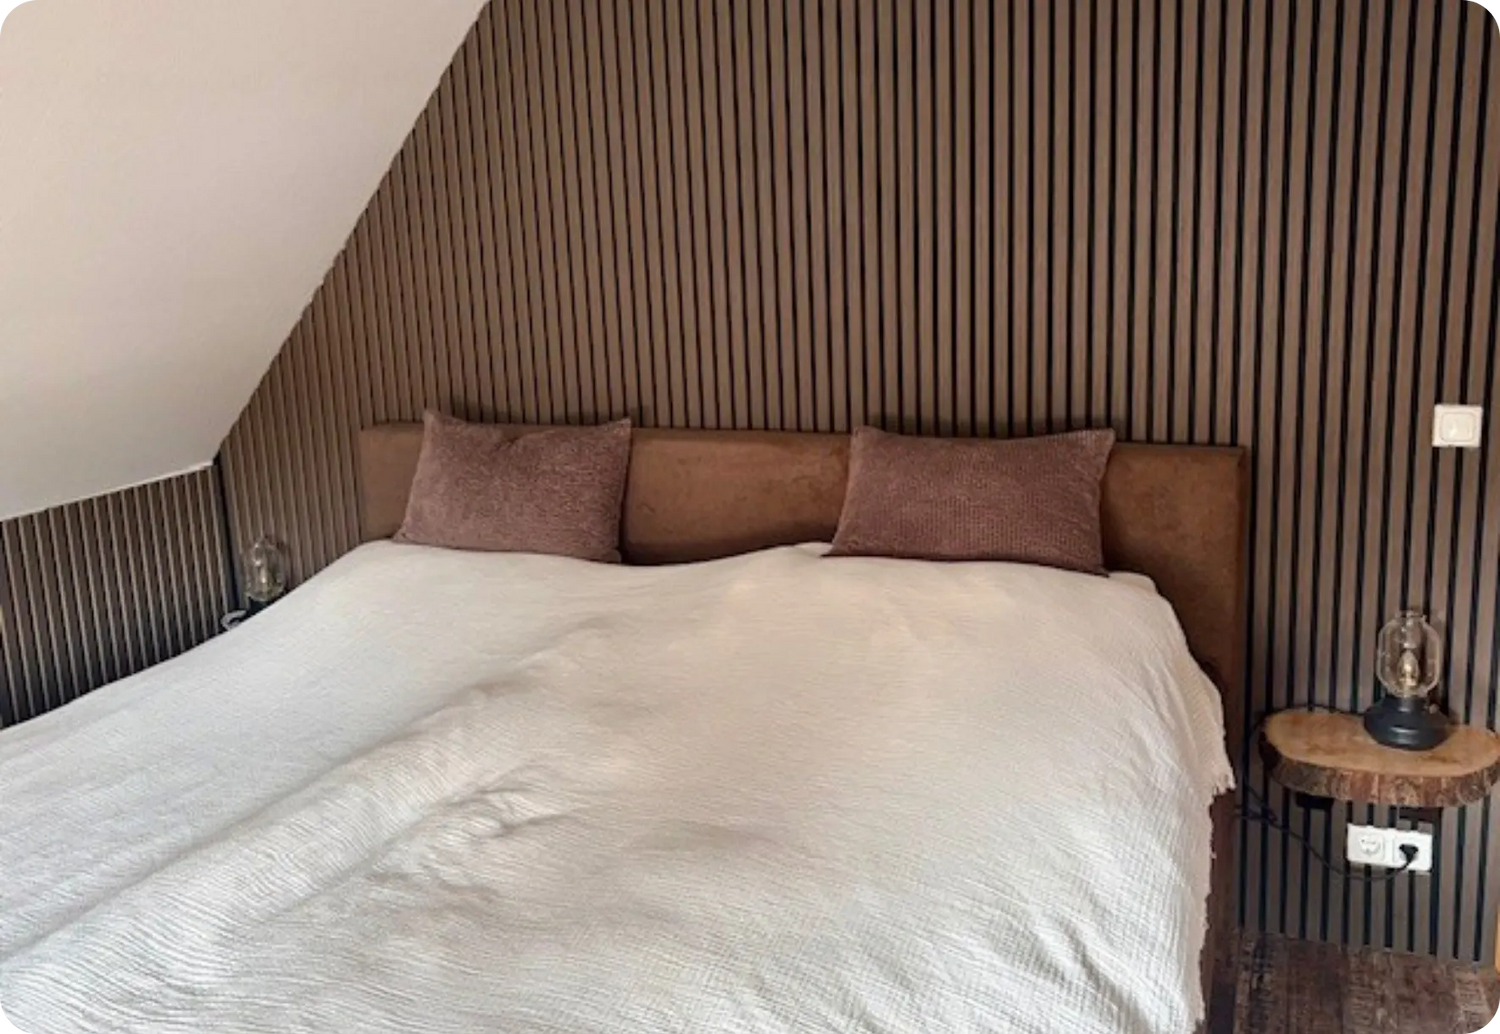
Sloped walls aren't an obstacle — with the right technique they become the highlight
Why Panels on a Sloped Ceiling?
Attic acoustics are challenging: Attic rooms have a particular acoustic character. The angled surfaces direct sound downward, where it bounces back and forth between the floor and the slope. Without treatment, the reverberation in a typical attic room can be noticeably longer than in a standard rectangular room. As few as 4–6 panels on one slope can reduce this significantly — bringing the room from echoey and hollow to comfortable and clear.
Design potential: Sloped ceilings are large, often empty surfaces that are difficult to decorate. Pictures hang at odd angles, shelves don't fit. Acoustic slat panels solve this problem: the vertical slats follow the slope and create a uniform, architectural look. Especially in attic bedrooms, this creates a cozy cabin atmosphere with a Scandinavian feel.
Mild insulation bonus: The felt backing and the air gap between panel and roof surface provide a slight additional thermal buffer. Not a replacement for proper roof insulation — but a noticeable difference on cold evenings when the sloped surface radiates less cold into the room.

Installation on a Sloped Ceiling: Step by Step
Knock on the sloped surface — is it plasterboard on battens, wooden beams, or solid masonry? For plasterboard: use cavity anchors or screw directly into the roof battens behind the board. For solid substrate: standard screws with wall plugs. More on substrates: subframe guide.
Draw a straight reference line on the slope — parallel to the roof edge. This is important because sloped ceilings are rarely perfectly straight. Work from bottom to top (from the knee wall upward toward the ridge), so any trimmed edges end up at the top where they're least visible.
Apply mounting adhesive in S-shaped lines on the panel back. Position the panel along the reference line and press firmly. Hold for 30–60 seconds until the adhesive grips.
Drive 15 screws per panel — distribute them evenly, with slightly more concentration in the upper third where gravity pulls hardest. The panel screws sit in the slat grooves and are virtually invisible once installed.
At the bottom of the slope (knee wall), the panels almost always need to be shortened — the usable height is typically less than the full 242 cm panel length. Measure the height, mark, and cut with a jigsaw. Detailed cutting instructions: cutting guide.
• Panels: 6 Standard (52 cm) or 5 Premium (60.5 cm)
• Adhesive: 4 cartridges (1 per 1.5 panels)
• Screws: 90 (15 per panel)
• Time: 2–3 hours
Full step-by-step for all mounting methods: complete installation guide.
3 Design Ideas for Sloped Ceilings
💡 1. Full slope as headboard
In an attic bedroom, the bed often sits under the slope. Cover the entire sloped surface above the bed with panels — it replaces the headboard and creates a cocoon effect. A warmer tone (Smoked or Light Brown) makes the room feel inviting and intimate. For a typical 3 m wide slope: 6 Standard panels.
Panels: 6 · Adhesive: 4 cartridges · Screws: 90
💡 2. Accent on one slope only
With two opposing slopes (typical gabled roof): cover only one side. This creates deliberate contrast — wood veneer on one side, white on the other. Visually, this makes the room feel wider because the white side reflects light. The treated slope handles the acoustic work while the contrast keeps the space feeling open.
Panels: 5–7 (depending on slope width)
💡 3. Slope plus knee wall — seamless transition
Let the panels run seamlessly from the sloped surface over the bend into the knee wall. This creates a continuous wood surface that hides the awkward angle and makes the room feel taller. Cut the panels at the bend point — the cutting guide covers the technique for angled cuts.
Effect: The room looks taller and more cohesive. The knee wall disappears visually into the design.

Color Recommendations for Attic Rooms
| Color | Best for | Why |
|---|---|---|
| Light | Attic rooms with small skylights or limited natural light | Opens the space visually, prevents a cave-like feeling |
| Smoked | Attic rooms with large skylights or dormer windows | Creates a cozy cabin atmosphere when enough light is present |
| Light Brown | Medium-sized windows, versatile spaces | The compromise — warm like Smoked but light enough for moderate daylight |
| Black | Home cinemas, gaming rooms, creative studios in the attic | Dramatic, immersive — works when the room is used primarily in the evening |
Special Considerations for Sloped Ceilings
Angle and mounting method
| Slope angle | Mounting method | Notes |
|---|---|---|
| 0–15° (nearly vertical) | Adhesive only (screws optional) | Treated like a standard wall. Gravity pull is minimal. |
| 15–30° | Adhesive + screws recommended | Gravity starts to matter. Screws provide security during curing. |
| 30–60° | Adhesive + screws required | Standard attic slope range. 15 screws per panel, focused on upper third. |
| 60–90° (near horizontal) | Treat as ceiling installation | Use 20 screws per panel. See ceiling guide. |
Working direction
Always work from the knee wall upward. This way the last panel (which typically needs trimming) ends up at the top near the ridge, where the cut edge is least visible. The bottom panels at eye level have clean, factory edges.
Subframe — needed or not?
Most plasterboard-clad attic slopes are flat enough for direct mounting. If the surface has unevenness greater than 5 mm (common in older buildings with rough plaster), a subframe creates a level mounting surface. A subframe also allows cable routing behind the panels — useful for LED lighting along the slope.
Frequently Asked Questions
Yes — the installation works like a standard wall with one key addition: for slopes of 30° or more, use adhesive plus screws together. 15 screws per panel provide the mechanical hold that prevents the panel from sliding over time. The result looks identical to a vertical wall installation.
In most cases, no. If the slope is clad with plasterboard or wood and is reasonably flat, mount directly to the surface. A subframe is only needed for significantly uneven surfaces or if you want to hide cables (e.g., for LED lighting). More: subframe guide.
At the knee wall (bottom of the slope): almost always, because the usable height there is typically less than the full 242 cm panel length. At the top: only if the slope reaches all the way to the ridge. The cut is straightforward with a jigsaw — the cutting guide explains the technique.
Measure the width of the slope and divide by the panel width (52 cm Standard, 60.5 cm Premium). For a 3 m wide slope: approximately 6 Standard panels or 5 Premium panels. Use the size calculator for exact quantities.
Noticeably. Attic rooms have unique acoustic challenges — the angled surfaces direct sound downward and create a bouncing effect between floor and slope. Even one treated slope (4–6 panels) can reduce reverberation significantly, making the room sound clearer and more comfortable. More: how effective are acoustic panels?
Depends on natural light. Small skylights → Light (keeps the space open). Large skylights or dormer windows → Smoked or Light Brown (creates warmth without feeling dark). Always test with a sample box at different times of day — attic light changes dramatically from morning to evening.
Conclusion: Sloped Ceilings Are Not an Obstacle — They're an Opportunity
What many see as a disadvantage is actually a large, untapped design surface. Acoustic panels on a sloped ceiling solve the acoustic challenges of attic rooms while simultaneously making the space the coziest room in the house. The installation is only slightly more involved than a standard wall (screws are added to adhesive), and the visual result — wood veneer slats following the slope — creates an architectural effect that flat walls simply can't match.
What does wood veneer look like on your slope?
Order a free sample box and hold it against your attic wall — the changing skylight makes the color choice especially exciting.
Free sample box → View all panels →Installation requirements depend on slope angle, substrate material, and specific building conditions. The angle-based mounting recommendations are general guidelines — always verify the substrate and load-bearing capacity before installation. Acoustic improvements vary by room size, shape, and surface materials.


Leave a comment
This site is protected by hCaptcha and the hCaptcha Privacy Policy and Terms of Service apply.