


Sound and style in one element — and how to integrate panels around your TV without the install showing.
Why the living room benefits more than most rooms
Living rooms combine three acoustic problems in one space: hard floors that reflect every step, large windows that bounce sound back, and minimal soft furnishings to absorb it. Add the open-plan layout most modern homes have, and conversations, TV audio, and music end up echoing around the room more than they should. Acoustic panels behind the TV — or along any large empty wall — reduce that reverberation immediately. The room feels calmer without the noise level actually changing.
There's also a design problem: the wall behind the TV is the largest visible surface in most living rooms, and it's almost always either empty paint or a half-hearted gallery wall. A panel wall solves both problems at once — visual anchor for the TV, sound absorption, and the warmth of real wood veneer in a single 30-minute install.
6 ways to use acoustic panels in the living room
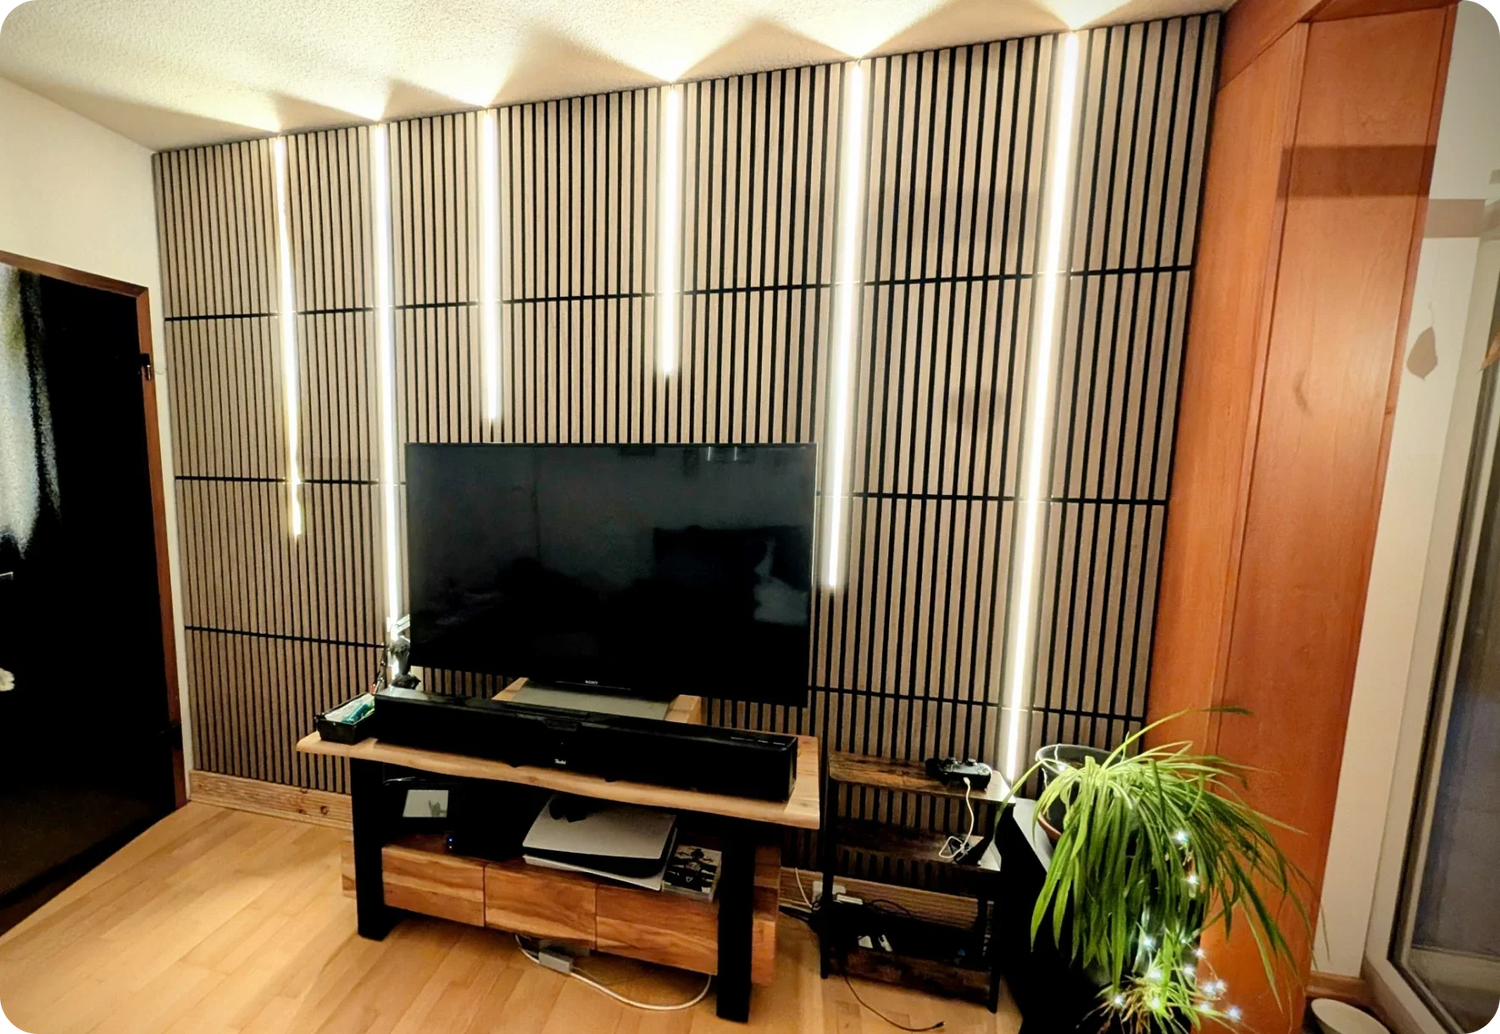
1. The TV feature wall
The most popular living room setup. Panels behind the TV from floor to ceiling, in a width slightly wider than the screen — or the full wall edge to edge. The TV stops looking like a hole in the wall and becomes part of an intentional design. For a 65-inch TV: 3 Premium panels is a common starting point. Smoked is the most popular tone for TV walls because it doesn't compete with the screen for attention.
2. Behind the sofa
If the TV is mounted on a different wall — or on a media unit rather than wall-mounted — the wall behind the sofa becomes the natural feature wall. Light Brown or Smoked work well here because they sit comfortably with sofa fabrics in linen, wool, or warm-grey tones. Pair with a low art piece or shelves on adjacent walls for balance.
3. Full feature wall — both sides
For larger living rooms or open-plan spaces, panels can cover an entire wall from corner to corner — making the wall itself the dominant design element. Best when ceiling height is at least 250 cm. Combine with floating media console and minimal art on the opposite wall to avoid visual overload.
4. Around the fireplace
Panels framing a fireplace turn the hearth into a clear focal point and add texture that paint can't deliver. Leave a 30-50 cm gap above and around the fire opening for heat clearance — check your fireplace manufacturer's guidance. Smoked or Black tones tend to complement dark fireplace surrounds particularly well.
5. Open-plan divider
In open-plan kitchen-living spaces, a section of panel wall can visually separate the zones without building an actual partition. Stop the panels at the natural boundary between the two areas. The vertical slat rhythm reads as architecture rather than decoration, and the absorption helps the open space sound less hard.
6. Reading nook or window accent
A smaller run of panels around a reading chair, between two windows, or as a column flanking a bookcase. Less commitment than a full feature wall, but adds character and softens the surrounding acoustics. Often combined with a wall-mounted reading lamp or floor light.
How to mount a TV through acoustic panels
This is the most common living-room install and the one most people get wrong. The principle is simple: panels go up first, TV goes up second, and the bracket goes through the panels into the wall behind. Done in the right order, you get a clean look with no visible mounting hardware. Done in the wrong order, you end up cutting panels around a bracket that's already drilled in.
Step 1 — Choose the right wall
Pick the wall where the TV naturally belongs — usually opposite the sofa, away from direct window glare. Decide whether the panels will cover the entire wall, or just the area behind the TV as a dedicated "TV zone". Either works; the full wall reads more intentional, the TV-zone-only is faster and uses fewer panels.
Step 2 — Install the panels first, not after
Always mount the panels before hanging the TV. Mark the TV's exact bracket position on the wall before applying any panels, so you know which panels will be drilled through. Panels can be cut precisely around the bracket area with a fine-toothed handsaw, jigsaw, or multi-tool — or simply drilled through cleanly with the bracket bolts.
Step 3 — Drill the bracket through the panels
Use strong wall plugs and screws to secure the TV bracket through the panel and into the wall behind. The MDF core drills cleanly with a standard wood bit. Be precise with your measurements and use a level — on a wall with vertical slats, even a 2-3 degree TV tilt is immediately visible. Pre-drill pilot holes to prevent splitting.
Step 4 — Hide the cables
Two options. (a) Run cables behind the panels — the 21 mm panel depth easily accommodates standard HDMI and power cables, hidden between the panel and the wall. (b) For a fully clean look, cut a small recess in the wall behind the panel and feed cables into the wall cavity itself. Either way, no cables visible below the TV.
Step 5 — Consider LED lighting (optional)
An LED strip behind the top edge of the panels creates an indirect glow that frames the TV and reads as deliberate design rather than aftermarket lighting. Warm white (2700K-3000K) suits living rooms — cool white feels clinical. The 21 mm panel depth hides standard LED strips and the power cable easily.
Choosing the right tone for a living room
The four Silentwood tones each create a different mood. Smoked accounts for the majority of TV-wall installs because it sits dark enough not to compete with the screen but warm enough to feel inviting. Light Brown is the second most popular for living rooms with wood floors and linen sofas. Black and Light occupy the ends — bold or bright depending on the room.
| Tone | Character | Best for living rooms with |
|---|---|---|
| Light | Bright, airy, Scandinavian | Small living rooms, north-facing windows, minimalist interiors |
| Light Brown | Warm, golden, timeless | Wood floors, linen sofas, earth-tone palettes |
| Smoked | Deep, warm, hotel-like | TV walls — most popular, hides cable shadow lines |
| Black | Dramatic, modern, architectural | Large living rooms with strong natural light, bold design |
For a full tone-by-tone breakdown with examples: wood veneer tones guide.
Frequently asked questions
Yes. The MDF core drills cleanly and the panels are stable enough to support a TV bracket once it's secured through to the wall behind. Use strong wall plugs in the underlying wall (drywall anchors or masonry plugs depending on the wall type) — the panel itself is not load-bearing.
For a 65-inch TV: 3 Premium panels (60.5 cm wide each) cover the TV-zone-only setup. For a wall-to-wall feature wall around the TV, measure the full wall width and divide by 60.5 cm. A typical 3.5-meter living room wall = 6 panels. Use the calculator for exact quantities plus adhesive and screws.
Soundbars work well in front of acoustic panels — the panels reduce wall reflection behind the soundbar, which generally improves clarity. If the soundbar is wall-mounted, it can be installed on top of the panels with the same through-bracket method as the TV. Avoid placing the soundbar directly against a panel — leave a small gap for airflow.
Yes. The 21 mm panel depth easily hides standard LED strips and the power cable. Most installs run the strip behind the top edge for an indirect glow, but side and bottom positions also work. Use warm white (2700K-3000K) for living rooms — cool white reads as clinical or office-like.
That's fine. Many living room installs put panels on the wall behind the sofa instead of behind the TV, especially in rooms where the TV is on a side wall or in a media unit. The panels still act as the room's design anchor, just from a different angle.
Two options. (a) Run cables behind the panels — the panel depth fits HDMI and power cables. (b) Cut a small recess in the wall behind the panel and feed cables into the wall cavity, then out at floor level near the power socket. For renters who can't cut into walls, option (a) plus a cable cover at floor level is the cleanest renter-friendly solution.
One wall, three problems solved
The living room is where most people spend their evenings — and where small improvements in atmosphere have the biggest cumulative effect. Acoustic panels solve the empty TV wall, the echo from hard floors, and the lack of natural warmth that paint can't deliver. The TV stops being a black rectangle on a flat wall and becomes part of an intentional design element. Within 30 minutes you've added what would otherwise take a renovation to achieve.
Once the panel wall is up and the TV is mounted through it, the rest of the room tends to fall into place around it. The hardest part — choosing the tone — is also the easiest to get right with a sample box held against the actual wall.
The individual effect of acoustic panels can vary depending on room size, materials, and furnishings. Acoustic panels reduce reverberation and echo — they do not provide complete sound isolation against external noise. Color perception varies depending on lighting conditions, monitor calibration, and personal preference. Material samples are recommended for final color decisions. Always check your fireplace manufacturer's heat clearance guidance before installing combustible materials near a fire opening.


Leave a comment
This site is protected by hCaptcha and the hCaptcha Privacy Policy and Terms of Service apply.