



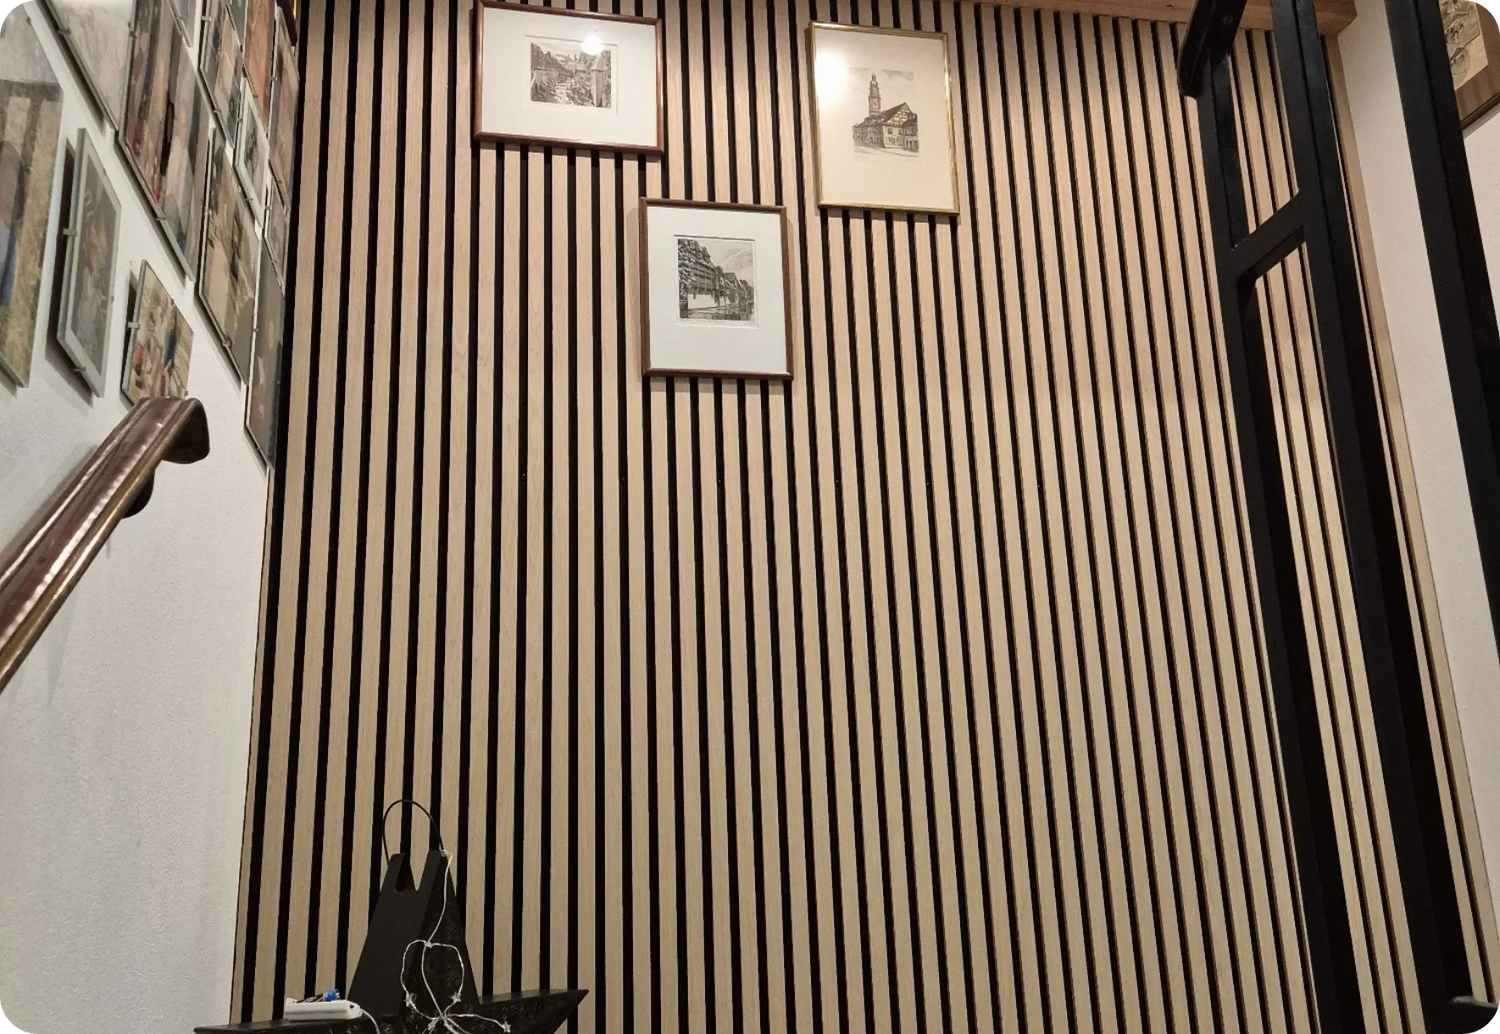
Why the stairway is the perfect place for acoustic panels - acoustically and visually
Why Acoustic Panels in the Stairway?
Extreme reverberation: Stairways are among the most reverberant spaces in any home. The open air column spanning multiple floors, concrete or plaster walls, and hard floors (tiles, stone, wood) create echo that far exceeds comfortable levels. Every footstep, every closing door, and every conversation carries through the entire house - amplified by surfaces that reflect rather than absorb.
Small area, big impact: In stairways, a few panels go a long way. The reason: in tall, narrow spaces, sound hits the same walls repeatedly. When you cover one of those walls with absorbing material, you break that cycle. 4-6 panels per floor (approximately 2-3 m² of surface area) can make a clearly audible difference - the space goes from echoey to comfortable.
An impressive entrance: In many homes - especially detached and semi-detached houses - the stairway is the first thing visitors see after the hallway. Wood veneer slats on the stairway wall immediately signal quality and design intention. Compared to a bare white-painted wall, the difference is dramatic and sets the tone for the rest of the home.

3 Design Ideas for the Stairway
💡 1. The stairway wall - top to bottom
The large wall running parallel to the stairs is the ideal location. Full-height panels (242 cm) extend the entire floor - and because the staircase rises alongside them, you see the slats from constantly changing angles and heights as you walk up or down. This creates a dynamic, almost sculptural effect that flat walls simply can't achieve.
Panels: 5-6 for a 3 m wide wall · Adhesive: 4 cartridges · Screws: 75-90
💡 2. Landing accent
Many stairways have an intermediate landing with a smaller wall (approximately 1.5-2 m wide). 3-4 panels create a focused accent here. Combine with a framed print, a plant, or a wall sconce - the landing becomes a small gallery rather than just a pass-through space.
Panels: 3-4 · Adhesive: 2-3 cartridges · Screws: 45-60
💡 3. Upper floor gallery effect
If the stairway is open at the top (gallery railing overlooking the stairs), mount panels on the opposite wall on the upper floor. From below, you look up and see the wood veneer slats as a visual ceiling - this gives the space an upper boundary and reduces the echo that otherwise escapes upward into the open air column.
Panels: 4-6 · Effect: Acoustic ceiling from below + design feature from the upper floor
Color Recommendations for Stairways
| Color | Best for | Why |
|---|---|---|
| Smoked | Most stairways - especially with wooden or stone stairs | Warm mid-tone that harmonizes with most stair materials. Looks impressive without being dominant. |
| Light | Narrow, dark stairways without windows | Reflects available light, makes the space feel airier. Good with concrete stairs or light tiles. |
| Light Brown | Versatile - works with most lighting conditions | Natural and neutral. Pairs well with both light and dark stair materials. |
| Black | Grand stairways with multi-floor windows and generous proportions | A bold statement - dramatic and architectural. Avoid in narrow, dark stairways. |
Mounting in the Stairway: Special Considerations
Anchoring
Stairway walls are often concrete or solid masonry - ideal for a secure mount. Use mounting adhesive (1 cartridge per ~1.5 panels) and panel screws (15 per panel) in combination, because stairways are exposed to vibrations from doors closing and footsteps. The dual attachment ensures long-term stability even with daily traffic.
Complete step-by-step instructions: installation guide.
Walls taller than 242 cm
Some stairways have wall heights of 3 m or more. Panels are 242 cm tall - for taller walls, you have two options:
Option 1: Stack a second, trimmed panel above the first. A narrow wooden trim strip at the join hides the seam cleanly.
Option 2: Mount panels only to 242 cm and leave the upper section free. This can look like an intentional design choice - a framed panel zone with a clean upper edge. Many architects deliberately use this approach for a more restrained, gallerist feel.
More on this: high ceiling solutions.
Stairway + carpet runner = maximum effect
Installation time per floor: approximately 2 hours for 5-6 panels (excluding scaffold setup).

Which Panel Format for Stairways?
| Format | Stairway advantage | Notes |
|---|---|---|
| 242 × 60.5 cm (Premium) | Wider slats look impressive on large stairway walls. Fewer seams for a cleaner look. | Best for main stairway walls where the panels are a design feature. |
| 242 × 52 cm (Standard) | Works well on narrower walls and landings. Easier to handle in tight spaces. | Practical for landings, turns, and smaller stairway walls. |
| 60 × 60 cm | Flexible layout for irregular wall shapes or partial coverage. | Good for accent patches or awkward wall sections near turns. |
For exact panel quantities based on your wall dimensions: size calculator. For panel format details: panel sizes guide.
Frequently Asked Questions
For one floor: 4-6 panels (approximately 2-3 m² of wall surface). This is typically enough to make a clearly audible difference. In open stairways spanning multiple floors, treating each level individually adds up - the more surface covered, the greater the reduction in echo.
Yes - noticeably. Stairways have extreme reverberation due to their height, hard surfaces, and open air column. Panels with a felt backing absorb the sound reflections that cause echo. Even a single treated wall makes a clear difference. Combined with a carpet runner on the stairs, the improvement can be dramatic. More: how effective are acoustic panels?
If you're comfortable working at height: yes. You need a stairway-rated ladder or scaffold board. The mounting itself is identical to any other room - adhesive plus screws. If you're unsure about the height work, a professional can typically complete one floor in 1-2 hours. The panels and adhesive are the same either way.
Two options: stack a trimmed second panel above the first (hide the seam with a narrow trim strip), or mount panels only to 242 cm and leave the upper section free as a deliberate design frame. Both approaches look intentional when executed cleanly. More: high ceiling guide.
For the main stairway wall: Premium (242 × 60.5 cm) - the wider slats look impressive on large surfaces. For landings and narrow walls: Standard (242 × 52 cm) - easier to handle in tighter spaces. For irregular wall sections near turns: 60 × 60 cm - flexible layout options.
Smoked is the most popular choice - the warm mid-tone works with most stair materials (wood, stone, tiles) and looks impressive without being overpowering. For dark stairways without windows: Light opens the space. For grand stairways with generous proportions and light: Black creates a dramatic architectural statement. More: color guide.
Conclusion: The Stairway as Design Statement
No other space in the home offers as much untapped potential as the stairway. The tall walls, the changing viewing angles, and the extreme echo make it the perfect candidate for acoustic panels - functionally and visually. A few panels per floor are enough to turn the most neglected space in the house into its most impressive feature. The stairway is where visitors look up, where sound carries, and where a wood veneer accent wall creates the kind of impression that sets the tone for the entire home.
Ready for a stairway upgrade?
Order a free sample box and test the look at different heights - light varies from floor to floor, and the color shifts with it.
Free sample box → View all panels →Acoustic improvements depend on stairway dimensions, wall materials, floor surfaces, and the number of panels installed. Results described are based on typical residential stairway configurations. Always use appropriate safety equipment when working at height. For walls taller than standard height, verify structural conditions before stacking panels.


Zanechať komentár
Táto lokalita je chránená testom reCAPTCHA a vzťahujú sa na ňu pravidlá ochrany súkromia a podmienky poskytovania služby hCaptcha.